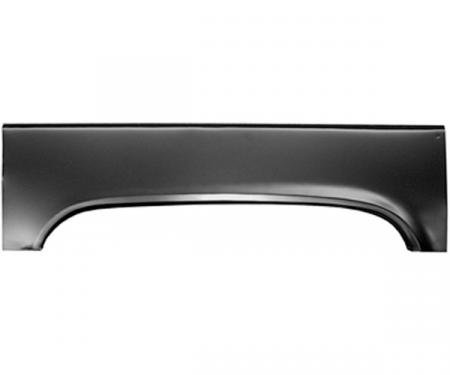
Direct-fit front lower left fender repair panel for 1960-1966 Chevy Pickup & Panel Truck. Designed to replace corroded or damaged lower front fender sections, this panel restores structural support, correct factory contours and panel alignment for a clean, factory-correct repair. Made from heavy-gauge steel with a corrosion-resistant finish, it’s shaped for straightforward fitment and welding or bonding, making it ideal for restorations, collision repairs and long-term durability.
Features:
- Fits 1960-1966 Chevy Pickup & Panel Truck — front lower left fender section.
- Stamped heavy-gauge steel for restored strength and longevity.
- Pre-formed OEM-style contours minimize trimming and bodywork.
- Corrosion-resistant coating to assist with rust prevention during installation.
- Designed for welding, plug-welding or bonding; ideal for restorations and collision repair.
- Restores panel alignment and wheelwell/door gaps for correct fitment.
Installation / Application:
- Difficulty: 3/5
- Estimated time: 2-6 hours (depending on rust extent and disassembly)
Instructions:
- Prepare vehicle: disconnect battery, remove wheel, inner fender liner, trim and any components obstructing access to the lower left fender area.
- Assess and mark the damaged area. Cut out the rusted or damaged section using an angle grinder or cutoff wheel, preserving as much good metal as possible.
- Clean and prepare mating surfaces by removing paint, rust and debris back to solid metal. Treat nearby metal with rust inhibitor if needed.
- Test-fit the repair panel, trimming or shaping the panel as required for exact alignment with adjacent panels and mounting points.
- Clamp the panel into position. If factory spot welds exist, locate and align plug-weld holes or drill matching holes for plug welding.
- Weld the panel in place using short tack or plug welds spaced per factory practice. For adhesives, follow the adhesive manufacturer’s instructions and use appropriate fasteners or weld-through primer where required.
- Grind welds flush and dress seams to match surrounding metal. Use body hammer/dolly for final contour adjustments.
- Apply seam sealer to all exposed seams, then prime with an etch or epoxy primer to protect the bare metal.
- Finish with primer and topcoat to match vehicle color. Reinstall removed components and inspect fitment and gaps for final adjustments.
Vehicle Fitment:
The Vehicle Fitment Guide is to be used as a general reference. The data has been provided by our suppliers and manufacturers and may contain errors or incorrect data. Always refer to a professional to verify correct fitment for your vehicle.
| Make |
Model |
Years |
| Chevrolet |
C10 Pickup |
1960 - 1966 |
| Chevrolet |
C20 Pickup |
1960 - 1966 |
| Chevrolet |
C30 Pickup |
1960 - 1966 |
| Chevrolet |
K10 Pickup |
1960 - 1966 |
| Chevrolet |
K20 Pickup |
1960 - 1966 |
| GMC |
1000 Series |
1960 - 1965 |
| GMC |
1000 |
1966 |
| GMC |
1500 Series |
1960 - 1965 |
| GMC |
1500 |
1966 |
| GMC |
2500 Series |
1960 - 1965 |
| GMC |
2500 |
1966 |
| GMC |
3000 |
1960 - 1966 |
| GMC |
3500 |
1960 - 1966 |
| GMC |
B3500 |
1964 - 1965 |
| GMC |
G1000 Series |
1963 - 1966 |
| GMC |
I1000 |
1964 - 1966 |
| GMC |
I1500 |
1965 - 1966 |
| GMC |
I2500 |
1965 - 1966 |
| GMC |
I3500 |
1966 |
| GMC |
K1000 Pickup |
1966 |
| GMC |
K1000 |
1966 |
| GMC |
K15/K1500 Pickup |
1966 |
| GMC |
L3500 |
1965 - 1966 |
| GMC |
LI3500 |
1966 |
| GMC |
P1000 |
1966 |
| GMC |
PB1000 Series |
1961 - 1966 |
| GMC |
PB15 Series |
1966 |
| GMC |
PB1500 Series |
1963 - 1965 |
| GMC |
PB25 Series |
1966 |
| GMC |
PB2500 Series |
1963 - 1965 |
| GMC |
PV1000 |
1960 |
| GMC |
Suburban |
1960 - 1966 |
| GMC |
Truck |
1960 |
| GMC |
V3000 Forward Control |
1960 - 1963 |