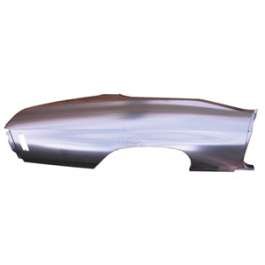
Complete right quarter panel for 1970-1972 Chevrolet Chevelle Convertible. This full replacement panel restores the exterior skin, wheel opening and rear body contours to factory dimensions, helping re-establish structural integrity and original appearance on convertible chassis. Built from heavy-gauge stamped steel with factory-correct contours and seam locations, the panel is engineered for restoration projects and professional repairs, providing a durable, long-lasting base for priming and painting.
Features:
- Fits 1970-1972 Chevrolet Chevelle Convertible (right / passenger side).
- Heavy-gauge stamped steel with factory-correct contours and seam locations.
- Full replacement assembly designed to restore body alignment, wheel opening and exterior appearance.
- Ideal for restorations and accident repair—replaces rusted or damaged original quarter panel.
- Weld-ready design for professional or experienced DIY installation; finish-prep required (primer/paint).
- Durable construction improves longevity and resists deformation when properly installed and finished.
Installation / Application:
- Difficulty: 4/5
- Estimated time: 4–12 hours (varies with experience and rust/damage extent)
Instructions:
- Prepare vehicle: disconnect battery, remove wheel, trim, interior panels, rear fascia and any components that obstruct access to the quarter panel.
- Assess and mark the damaged or rusted area, locating original welds and seams to plan removal.
- Cut out the old quarter panel sections using an angle grinder and spot weld cutter; preserve any usable mating flanges if possible.
- Clean and prepare mating surfaces by removing rust, paint and debris; ensure proper fit by dry-fitting the replacement panel.
- Make any necessary trimming or minor adjustments to achieve correct alignment with door, trunk and wheel opening gaps.
- Clamp the panel in position and tack weld at multiple points, checking alignment frequently as you work.
- Complete continuous welds where required, using proper welding technique to avoid warping; stitch-weld or plug-weld as appropriate to match factory seam locations.
- Grind welds smooth, use hammer and dolly to restore contours, and apply body filler where needed for a smooth finish.
- Apply seam sealer to welded seams and corrosion protection to all exposed bare metal.
- Prime, paint and clearcoat to match vehicle finish, then reassemble removed components and perform final alignment checks.
Vehicle Fitment:
The Vehicle Fitment Guide is to be used as a general reference. The data has been provided by our suppliers and manufacturers and may contain errors or incorrect data. Always refer to a professional to verify correct fitment for your vehicle.
| Make |
Model |
Years |
| Chevrolet |
Chevelle |
1970 - 1972 |